Choosing a medicine cabinet sounds simple until you start looking. There are dozens of sizes, lighting options, installation types, and configurations — and it's not always obvious which combination makes sense for your bathroom. This guide breaks it down into the decisions that actually matter, so you can find the right cabinet without second-guessing yourself.
How to Install a Medicine Cabinet: Recessed vs Surface Mount
Installing a medicine cabinet is one of the most practical upgrades you can make to a bathroom. It adds storage, a mirror, and in many modern models, lighting and charging right where you need them. But before you buy, it helps to understand how medicine cabinets are installed — because the method you choose affects how the cabinet looks on the wall, how much work is involved, and what kind of wall you're working with.
The good news is that most medicine cabinets today, including all BrumaBath models, support both installation methods. So you can decide based on your bathroom, your wall, and how much work you want to take on — not based on the cabinet itself.
What's the Difference?
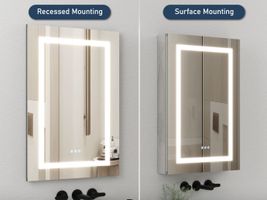
A surface mount medicine cabinet sits on top of the wall, like a picture frame. Installation is straightforward — you find the studs, drive in the screws, and hang the cabinet. The cabinet will project a few inches out from the wall, which is noticeable but perfectly functional.
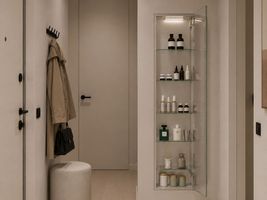
A recessed medicine cabinet sits inside the wall, flush with the surface. From the front, it looks built in, like it was always meant to be there. It takes a bit more work to install, but the result is cleaner.
Which One Is Right for Your Bathroom?
The honest answer is that it depends on your wall. Most interior walls in American homes are built with 2x4 wood studs spaced 16 inches apart on center, which leaves 14.5 inches of usable space between them.
A standard 15" wide medicine cabinet fits almost perfectly into that gap, which is exactly why recessed installation is so common.
If your bathroom has a 12" wide cabinet, it fits easily between studs. A 20" or 24" wide cabinet will span across one stud, which means you'll need to cut and reframe the opening — a job that's straightforward for anyone comfortable with basic carpentry, but worth knowing about before you start.
Surface mount is the better choice if your wall has tile all the way to the ceiling, if you're renting, or if you simply don't want to cut into the wall. It's also the faster option if you need the cabinet up quickly.
How to Install a Surface Mount Medicine Cabinet
Surface mount installation is the more accessible of the two. Here's what the process typically looks like.
Step 1. Find your studs. Use a stud finder to locate the studs behind the drywall. Mark their positions lightly with a pencil. Most studs are 16 inches apart on center.
Step 2. Mark the position. Hold the cabinet up to the wall and mark where you want it. Use a level to make sure it's straight. Mark the screw hole positions.
Step 3. Drive the screws. If your cabinet's mounting holes line up with studs, drive screws directly into the studs. If not, use wall anchors rated for the weight of the cabinet.
Step 4. Hang the cabinet. Lift the cabinet onto the screws or mounting bracket and make sure it's secure. Check level one more time before finishing.
Watch our step-by-step guide to surface mount installation, no wall cutting required, and most bathrooms are ready to go in under an hour.
How to Install a Recessed Medicine Cabinet
Recessed installation takes more preparation but the finished result is worth it. Here's the general process.
Step 1. Choose your location. Decide where you want the cabinet and check what's inside the wall at that spot. Use a stud finder to locate studs, and make sure there are no pipes or electrical wires in the way. A small inspection hole can save a lot of trouble.
Step 2. Mark and cut the opening. Mark the outline of the cabinet opening on the wall. Cut carefully with a drywall saw. If your cabinet is 15" wide, it should fit neatly between two studs without any framing modifications.
Step 3. Frame the opening if needed. For wider cabinets that span a stud, you'll need to cut the stud and add horizontal blocking above and below the opening to maintain wall structure. This is standard carpentry and doesn't require specialist skills.
Step 4. Slide the cabinet in. Most recessed cabinets come with a frame that sits in the wall opening. Slide it in, check that it's level, and secure it to the framing with screws.
Step 5. Finish the edges. Many cabinets include side panels or trim pieces to cover the gap between the cabinet frame and the drywall edge. Snap or screw them into place for a clean finished look.

Watch our step-by-step guide to recessed installation for a flush, built-in look that makes the cabinet feel like part of the wall.
Do All Medicine Cabinets Support Both Installation Types?
Most quality medicine cabinets are designed to work both ways. All cabinets in the BrumaBath lineup — including the Glow Collection, Infinity Collection, BrumaSmall, and BrumaTall — support both recessed and surface mount installation. Side panels are included with every cabinet for a finished look regardless of which method you choose.
If you're unsure which to choose, surface mount is always a safe starting point — and if you ever want to switch to recessed later, the option is there.
Browse the full BrumaBath medicine cabinet collection to find the right size and style for your bathroom.